Saturday, June 28, 2008

Retired Stampin Up sets for sale on Ebay

I've finally made time to list the remainder (majority) of my retired sets on ebay. To check them out you can go to this link http://search.ebay.com.au/_W0QQsassZnicoleds2002

or if that doesn't get you there search my ebay id which is nicoleds2002.

I'm hoping to get some more regular posting done this week. It's been a busy few weeks and then at the end of this coming week is school holidays. School holidays isn't usually something I look forward to, 4 girls at home fighting constantly. I suppose I'm exaggerating a little there. It's not constantly but it does seem that way at times. The one thing I do look forward to though, especially at this chilly time of year, is not having to get up and organised so early.

Enough rambling from me. Take a look at my items for sale. All items had a starting bid of $0.99 and there are even Alphabet sets listed at this price.

Hopefully I'll be back in the next day or 2 with something I've created to share with you all.


 photo Nikki4.png

Sunday, June 15, 2008

Baroque Trio

Baroque Birthday Trio

Friday night was my fortnightly get together with friends to stamp at my house. 2 of us had birthdays earlier this month (1 day apart in fact) another has hers next week and the other regular lady (who is a very good friend) had hers in March but slacko me never got around to making her a card. Well I didn't want to make the other 2 ladies a card and not my very good friend so even though it was late she finally received one.

I decided to make 3 similar cards shown above using different colour combinations.

Baroque Birthday Gauva

1st up I used the colour combination that was used on the Groovy Roses card in this post of Groovy Guava, Blush Blossom and a touch of Mellow Moss.  I've used Mellow Moss eyelets and some Mellow Moss ribbon from the Sherbet Ribbon Originals pack.

Supplies:

Stamp sets: Baroque, Short & Sweet
Cardstock: Very Vanilla, Blush Blossom, Groovy Guava
Inks: Mellow Moss, Groovy Guava
Accessories: Label Punch, Large Oval Punch, Mellow Moss eyelets (Soft Subtles pack), Mellow Moss ribbon (Sherbet Ribbon Originals), Stampin' Dimensionals.

Baroque Birthday Bayou

The 2nd card is a combination from the SU Color combo site. I selected Blue Bayou, Soft Sky and Very Vanilla and among other combinations that came back was Groovy Guava. Now we don't have Groovy Guava brads so I have used Blush Blossom from my retired Soft Subtles II pack. Not much I could do about that as I didn't want to add another colour such as silver or black and seeing it was a card for a friend I didn't think she would mind.


Baroque Birthday Pomegranate


The last card is another selection from the SU Color Combo site. I picked Purely Pomegranate, Groovy Guava and Very Vanilla and then from the selections that came back I chose to go with Chocolate Chip. Like with the last card we don't have Chocolate Chip brads so I had to use my stash of 'non-SU' brads, I know pretty bad but what else could I do? I looked at the metallic's pack but the Antique Brass just wasn't right. I'm sure she will forgive me.


So what colour combination do you like best??


 photo Nikki4.png

Saturday, June 14, 2008

kwernerdesign Challenge #11

I have been looking at Kristina's site for weeks and meaning to play along with one of her Colour Inspiration Challenges but just haven't had time. Well yesterday afternoon I noticed the post for her latest challenge and decided that I could do these colours, so last night at my stamp night with friends I was determined to make a card to participate. 

This is the Colour Inspiration Challenge for this week.

061208-color

I actually managed to create 2 cards for this challenge. I also gave myself another challenge and that was to use a set I haven't used much or not at all.

I already had my Spring Solitude Hostess Bundle out as I was using that on something else I needed to complete, so my first card is using that set.

Spring Solitude kwdc#11

I've used a small amount of Going Gray cardstock which unfortunately isn't available any longer however I thought this would fit better than one of the other colours here. Mind you I probably could have gone with Whisper White  and daubered around the edges for some added colour. Hmm...maybe I'll revamp with only current supplies. What do you think?

Supplies:

Stamp sets: Spring Solitude Bundle (Hostess Level 2)
Cardstock: Rose Red, So Saffron, Whisper White, Going Gray (retired)
Ink: So Saffron, Going Gray, Old Olive, Rose Red
Accessories: Word Window Punch, So Saffron & Rose Red Brad (Rich Regals pack), Old Olive 5/8" Grosgrain ribbon, Stampin' Dimensionals.

Now the second card is using the Sweet Shapes set. I'm a little embarrassed to say that I have had this set for a while now but it's never seen ink before now. Everything is current Stampin' Up supplies on this card.

Sweet Shapes kwdc#11

I was quite happy with the end result on this card and must make more effort to use this set. I've used some Old Olive Prints DSP in this card and am enjoying using the SU papers more and more these days.


Supplies:

Stamp sets: Sweet Shapes
Cardstock: Rose Red, Whisper White, Old Olive Prints DSP
Inks: Going Gray, Old Olive, Rose Red, So Saffron
Accessories: Whisper White Taffeta ribbon, So Saffron brads (Rich Regals pack), Stampin' Dimensionals.


 photo Nikki4.png

Friday, June 13, 2008

Groovy Roses

While browsing SplitCoastStampers the other day I came across this wonderful card made by fellow Australia Stampin' Up Demonstrator Teneale Williams and I loved the colour combination she had used, among other things.

Now my card I'm going to share with you doesn't compare to Teneale wonderful card but I was still happy with it. Groovy Guava has probably been my least favourite of the new In Colours up until now. The first time I used it, back in this post, I wasn't overly happy with it. I like it more with subtle colours I think. Time will tell once I use it a little more.

As you may well know I do have the Brocade Basics set that Teneale used in her card but I didn't want to end up with a full on CASE so I decided to use the same colours and use Wild Roses instead. I don't know about other demo's but I tend to find that I neglect my carryover sets and use new ones more often especially in the first few months. I'm going to try not to do that so much this Idea Book & Catalogue year.

So here's my card: Groovy Roses

I've started out with an A5 piece of Groovy Guava, folded to form card. Next I've layered a 144mm x 101mm piece of Blush Blossom.

The main piece is 140mm x 97mm Very Vanilla. I have stamped the medium rose in Blush Blossom ink randomly and then stamped the overlay in Groovy Guava, using the Stamp-a-ma-jig for placement. Next I stamped the leaf images (leaf & leaf overlay) in Mellow Moss using the Stamp-a-ma-jig. I then did the same using the small single rose bud to fill in some of the gaps. Finally I stamped the sentiment from Sincere Salutations using Groovy Guavy ink.

So there you go. A lot simpler that Teneale's gorgeous card which I'm sure I'll end up CASING, but I'm happy with the end results. This will definitely be a colour combination I'll play with a little more and my opinion of Groovy Guava has definitely changed.

Supplies:

Stamp sets: Wild Roses, Sincere Salutations
Card: Groovy Guava, Blush Blossom, Mellow Moss
Ink: Groovy Guava, Blush Blossom, Mellow Moss
Accessories: Stamp-a-ma-jig.


 photo Nikki4.png

Thursday, June 12, 2008

Emerging Colour 2

This time I used Fabulous Flowers and brighter colours too.

To make my Emerging Colour piece I've started out again with an A6 piece of Whisper White card. I have randomly stamped the smaller flower images from Fabulous Flowers in Pixie Pink, Lavender Lace, Pretty In Pink and Old Olive over the Whisper White card. These colour where taken from the Colour Coach. Allow to dry. Once dry I have rubbed the piece with and Embossing Buddy.

Next I inked the large flower using Versamark and stamped onto the Whisper White piece, sprinkled clear embossing powder over the top, removed the excess and heated with a heat gun. Once cooled, I inked my brayer with Elegant Eggplant Classic Ink and brayered over the top until happy with the colour. Allow to dry. Using a tissue remove ink from embossed flower.

Using the large swirl image from Priceless and Night of Navy Classic Ink, I randomly stamped over cardstock. Again I used a tissue to remove any ink from embossed flower.

Fabulous Flowers - Emerging Colour To make the completed card I started with an A5 piece of Elegant Eggplant and folded in half using a bone folder to give a crisp fold.

Using the large swirl image from Priceless and Pixie Pink ink I have randomly stamped over a 144mm x 101mm piece of Pixie Pink cardstock. Using the slot punch I've created inverted corners on the  Pixie Pink cardstock and then layered onto main card.

I've trimmed my Emerging Colour piece to 85mm x 80mm utilising most of my main image. Using the slot punch I have created inverted corners again. This has then been layered onto a 88mm x 83mm piece of So Saffron cardstock and adhered to card as shown.

Next I inked the Dare to be Fabulous stamp in Elegant Eggplant and stamped onto Whisper White cardstock. This was trimmed down to 75mm x 30mm and corners were punch with the slot punch. I have then layered this onto a 78mm x 33mm piece of Old Olive and adhered to card using Stampin' Dimensionals.

I then stamped 2 of the smaller flowers on scrap Whisper White card using Lavender Lace & Pretty In Pink inkpads. These have been cut out and Rhinestone brads have been added to the centres. The Lavender Lace flower has been adhered using Mini Glue Dots and the Pretty In Pink using Stampin' Dimensionals.

So what do you think?

Supplies:

Stamp sets: Fabulous Flowers, Priceless
Card: Elegant Eggplant, Pixie Pink, So Saffron, Old Olive, Whisper White
Inks: Pixie Pink, Lavender Lace, Pretty In Pink, Old Olive, Elegant Eggplant, Versamark
Accessories: Slot Punch, Clear Embossing Powder, Embossing Buddy, Rhinestone Brads (Fire & Ice sets), Mini Glue Dots, Stampin' Dimensionals.


 photo Nikki4.png

Wednesday, June 11, 2008

Emerging Colour 1

I've been wanting to try this technique for a while and now that I have Fabulous Flowers what better time. You can find a tutorial for this technique here on SCS and many other techniques can be found here.

I've made 2 cards using this technique but I will post 1 each day and give you more info on how I made the cards.

For my first card I thought I would use Looks Like Spring. It's been a while since I have used this set and seeing how it has co-ordinating Designer Series Paper, that I also haven't used in a while, I have taken my colours from the Spring Flowers pack and I have incorporated some of them into my card.  I'm quite happy with the results but I think I would have stamped the larger flower closer together so more colours would emerge..... Let me know what you think. 

My first step is to create my focal image using the Emerging Colour Technique.

I started out with an A6 piece of Whisper White cardstock which I trimmed down later. Using the trio flower stamp from Looks Like Spring and the Cameo Coral, Barely Banana & Mellow Moss Stampin' Write Markers, I've inked up the flowers and randomly stamped onto the Whisper White card. (Remember when using markers to huff on your stamps to re-moisten before stamping.) Allow to dry.

Once dry I inked up the large flower with Versamark and raLooks Like Spring - Emerging Colour
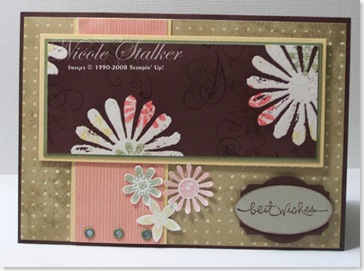
ndomly stamped onto this same piece of card overstamping some of the trio flower images. Apply clear embossing powder and heat with heat gun. Once cool, I inked up my brayer with Chocolate Chip Classic Ink and applied over the top. Keep applying until you are happy with the colour. Allow to dry and then using a tissue, wipe off any colour from the embossed images. The colours have emerged. I have then used the Chocolate Chip inkpad again and the small swirl image from Priceless and randomly stamped the card. Again wipe off ink from embossed flowers.

This completes your Emerging Colour piece.

To make the card I've started out with an A5 piece of Chocolate Chip card which I folded in half to form my card. The edges have then been sponged using a sponge dauber and Chocolate Chip ink. I have then cut a 144mm x 101mm piece of Spring Flowers DSP and sponged using Sahara Sand ink and a sponge dauber. Adhere to main card.

Next I cut a 40mm x 101mm piece of Spring Flowers DSP (Cameo Coral colour) and layered onto a 43mm x 101mm piece of Barely Banana cardstock. This is then adhered to card as shown. I have set 3 Mellow Moss eyelets on bottom of last layer. (Template guide is great for even placement of eyelets.)

I have then cut down my Emerging Colour piece to 120mm x 50mm. Layer this onto a 123mm x 53mm piece of Mellow Moss and then onto a 127mm x 57mm piece of Barely Banana. Layer this piece onto card as shown using Stampin' Dimensionals.

Next I stamped 'best wishes' from Short & Sweet onto Sahara Sand cardstock using Chocolate Chip ink. Punch out using Large Oval Punch and sponge edges lightly using a sponge dauber and Chocolate Chip Ink. Punch out a Label Punch from Chocolate Chip cardstock and layer oval on top. Adhere to card using Stampin' Dimensionals.

Lastly, I've inked the trio flower image from Looks Like Spring using Cameo Coral, Barely Banana & Mellow Moss Stampin' Write Markers and then punched out using the Spring Bouquet Punch. Adhere to card using Mini Glue Dots.


Supplies:

Stamp sets: Looks Like Spring, Priceless, Short & Sweet
Card: Chocolate Chip, Barely Banana, Mellow Moss, Sahara Sand, Spring Flowers DSP
Inks: Chocolate Chip, Versamark, Cameo Coral, Barely Banana & Mellow Moss Stempin' Write Markers.
Accessories: Label Punch, Large Oval Punch, Spring Bouquet Punch, Soft Subtles eyelets, sponge daubers, clear embossing powder, heat gun, brayer, Stampin' Dimensionals. Tool Kit, Mini Glue Dots.


 photo Nikki4.png

Tuesday, June 10, 2008

Some more Priceless.....

I would have to say one of the hardest things I find about blogging my cards is names for the posts. Second would be what to write about them. I sure hope I don't bore you all with my writing as it's not one of my strong areas. I've never been a real letter writer and much prefer to speak to people either face to face or over the phone. Hopefully as time goes on I'll improve and keep you all more interested and eager for my next posting like some blogs I visit do.

Enough rambling, lets get to the cards which is why you are here.

The cards today are both using the lovely Priceless stamp set, hence the name of the title for today's post.

Priceless 3 To make this card I started with an A5 piece of Sahara Sand which was folded in half and pressed with my  bone folder. Next I've added a piece of Rose Red Prints Designer Series paper 144mm x 101mm.

On a piece of Very Vanilla cardstock 62mm x 102mm I have stamped the large swirl image from the Priceless set using Old Olive Classic Inkpad. This is then mounted onto a piece of Old Olive card 65mm x 102mm and adhered to main card. Next step was to stamp the flower using Rose Red Classic inkpad and the butterfly using Blue Bayou Classic Inkpad from the Priceless stamp set onto some scrap Very Vanilla cardstock and cut out. These are then layered onto card as shown using Stampin' Dimensionals.

I then stamped the words 'So Kind' onto a scrap of Very Vanilla cardstock and punched out using the Large Oval Punch. Using a sponge dauber and Old Olive inkpad I've sponged lightly around the edges of the Oval punch. Next I punched out a Label Punch from Blue Bayou Cardstock. Adhere the oval punched word using adhesive onto the label punch and then mount to main card using Stampin' Dimensionals.

Supplies:

Stamp sets: Priceless
Card: Sahara Sand, Old Olive, Blue Bayou, Very Vanilla, Rose Red Prints DSP
Inks: Old Olive, Blue Bayou, Rose Red.
Accessories: Label Punch, Large Oval Punch, Stampin' Dimensionals, Sponge dauber.

Priceless 4

To make this card I started with an A5 piece of Real Red cardstock which is folded in half and pressed with my bone folder. I have then layered a 144mm x 101mm piece of So Saffron cardstock which has been randomly stamped using the large swirl image from Priceless and So Saffron Classic ink.

I then stamped the large swirl image twice using Wild Wasabi inkpad onto a piece of Confetti White cardstock 144mm x 50mm. Using the So Saffron inkpad and small flower image from Priceless, I have stamped this onto the Confetti White cardstock as shown. Next I stamped the large flower image using Real Red inkpad onto a scrap of Confetti White card and cut out. A So Saffron brad has been added to the centre.

I have then scalloped one long edge of a 144mm x 60mm piece of Blue Bayou cardstock using the small corner rounder punch. The Confetti White piece is then layered onto this Blue Bayou piece and mounted to card as shown. I've attached the flower using Stampin' Dimensionals. Lastly I've stamped the Priceless word onto the So Saffron cardstock using Real Red inkpad.

Can you see what I didn't do in this card that I have done in my other recent posts????

Supplies:

Stamp sets: Priceless
Card: Real Red, So Saffron, Blue Bayou, Confetti White.
Inks: Real Red, Wild Wasabi, So Saffron
Accessories: 3/16" corner rounder punch, Rich Regal Brads, Stampin' Dimensionals.


 photo Nikki4.png

Monday, June 9, 2008

Cherish x 2

I'm going to share another 2 cards with you today. Both of these are made using the same set, Baroque Motifs, but different colour combinations. The combinations I've selected have come from the 'Mix it up with Color!' combination sheets that Stampin' Up provide us to show colour combinations using the new In Colours with our constant Family Colours (Bold Brights, Earth Elements, etc)

Baroque Motifs 4  This is the first colour combination I chose and is using 4 of the new In Colours.

I've used the Label Punch and Large Oval Punch, yet again, to highlight and add my word. I really love the use of these punches in this way.

The Photo corner punches have also been paper pierced using the paper piercing template and tool from the Tool Kit. Both Photo Corners are large so I've punched out 2 sets.

The edges of the Very Vanilla card for both the main layer and also the word have been sponged using a sponge dauber and Blue Bayou inkpad.

Supplies:

Stamp sets: Baroque Motifs
Card: Blue Bayou, Very Vanilla, Soft Sky
Inks: River Rock, Groovy Guava, Soft Sky, Blue Bayou
Accessories: Label Punch, Large Oval Punch, Photo Corner Punch, sponge dauber, Stampin' Dimensionals, Paper Piercing template & tool.

This next card is using different colours obviously and just a few slight differences.

Baroque Motifs 3 This combination uses 2 of the new In Colours and 2 of our standard colours.

I've positioned the main image slightly higher and on more of an angle. The photo corners have only been pierced with one row and I've just used one set so the bottom corner punch is slightly smaller then the top one. Again I've used the Label Punch and Large Oval punch for my word.

The edges of the Whisper White card for the main layer and word have been sponged using a sponge dauber and Soft Sky inkpad.

Supplies:

Stamp sets: Baroque Motifs
Card: Soft Sky, Rose Red, Whisper White
Inks: Wild Wasabi, Rose Red, Pumpkin Pie, Soft Sky
Accessories: Label Punch, Large Oval Punch, Photo Corner Punch, sponge dauber, Stampin' Dimensionals, Paper Piercing template & tool.


 photo Nikki4.png

Sunday, June 8, 2008

Finally some cards to share

I finally managed to create again last night. I've had some busy days again, along with finishing up a Collaborative Book swap I was hosting on a yahoo group I'm in, and I've also had no real motivation to stamp lately. No inspiration and just been in a bit of a slump. I'm sure we all have this from time to time.

Well yesterday I was determined to break this bad slump I was in and stamped in some Friendship Books (from the yahoo group I'm in) that I had received through the week and I also needed to make a Friendship Book to send out. My good friend and neighbour had also asked if I wanted to stamp at her house last night so I wanted to have my inspiration flowing so I didn't go over and just chat like we do some weeks at my fortnightly get togethers. We managed to still chat but I also made 4 cards just playing around with some colour combinations.

I'm not going to show you all my cards at once, I'll share a couple with you now and then some more tomorrow.

Brocade Basics 6 This is the Friendship Book I've made to start doing it's rounds and heading to a lucky recipient (I think they're lucky so I hope they do too). Friendship Books are basically a card with 4 - 6 insert pages inside which are then sent to other players on the list to create a page. When all pages have been completed the book is then forwarded onto the intended recipient to enjoy.

Supplies:

Stamp sets: Brocade Basics, Warm Words, Fine Lace
Card: Always Artichoke, River Rock, Very Vanilla
Inks: Old Olive, Groovy Guava, Always Artichoke, River Rock.
Accessories: Groovy Guava Double-Stitched Ribbon, Label Punch, Large Oval Punch, Pretties Kit (1/2 pearls), sponge daubers, Stampin' Dimensionals.

Now after creating this card which I really liked I decided to make another using different colours and just a few minor differences.

Brocade Basics 5 The minor differences are that I didn't use the Pretties Kit on this one but instead I stamped the flower on another piece of card, cut out and layer on top using Stampin' Dimensionals. I quite like the colour combination of this one too.

Supplies:

Stamp sets: Brocade Basics, Fine Lace, Warm Words
Card: Blue Bayou, River Rock, Very Vanilla
Inks: Mellow Moss, Purely Pomegranate, Blue Bayou, River Rock
Accessories: Label Punch, Large Oval Punch, Purely Pomegranate Double-Stitched Ribbon, sponge daubers, Stampin' Dimensionals.

My friend was saying last night how much I have used this set. To be honest it wasn't a set I had initially intended to purchase. Shelli Gardner (CEO of Stampin' Up) showed the demonstrators who attended Convention back in April some cards she herself had made using this set. I loved what she had done and changed my mind on purchasing this set so came home and ordered it along with some other things I then had to have. I still have not recreated the card using this set and the technique Shelli showed us but have used it to make a few cards of my own. I just love it.

I hope you enjoy what I've created with it also.


 photo Nikki4.png