Sunday, August 31, 2008

Certainly Priceless

I haven't been creating much lately, until yesterday anyway, but I did have some thing to share and just didn't get around to photographing and editing them before now. I should have a few postings over the next few days and hopefully when they run out I'll have created some more.

This first post is using the Priceless stamp set and coordinating So Swirly Jumbo Wheel. I love the Jumbo Wheels.

Garden Whimsy - Tearing

The concept for this card came from a card Krista made in this post. Krista has used the Nestabilities in her card but seeing this was a card for my July Stamp Class I prefer to use only things that Stampin' Up sell. I'm still very happy with the result.

I love how quick and easy this card comes together. I think the longest part is cutting out the butterfly and flower.

Supplies:
Stamp sets: Priceless, So Swirly Jumbo Wheel
Cardstock: Certainly Celery, Almost Amethyst, Regal Rose, Whisper White.
Inks: Certainly Celery, Almost Amethyst, Regal Rose
Accessories: Certainly Celery 5/8" grosgrain ribbon, Stampin' Dimensionals.


 photo Nikki4.png

Friday, August 15, 2008

My Cute Little Card Bag Tutorial


clip_image002

This is my first ever Tutorial so I hope I have included enough photos (but not too many) and that the instructions are clear enough for everyone regardless of ability.  Email me if you need any further assistance.

I've made my bag using Inches but have included measurements in Millimetres also for those that prefer to use them. This bag is made to fit Australian sized cards (148mm x 105mm(A6) or 5 7/8" x 4 1/8").


clip_image004

Supplies:

  1. 2 x 10" (254mm) x 7 1/2" (191mm) pieces of Designer Series Paper (or cardstock)
  2. Paper Trimmer & Scorer.
  3. Sticky Strip
  4. Paper Snips.


Step 1. Score longer side of both pieces at 2"(51mm) and 8" (203mm).

Step 2. Turn and score shorter side at 1 1/4" (32mm) and 3 1/4" (83mm). Fold all score lines.


clip_image006


Step 3. Take one piece and using your paper trimmer you need to cut 3/4" (19mm) in on each side (as marked with X) between score lines, being careful not to go over score lines.


clip_image008


Step 4. Using paper snips cut along score line either side of section cuts just placed as shown. This will remove the cut section once both sides are done and create the lid section.


clip_image010


Step 5. Trim a small angled piece off top flap. This is how your 1st piece should now look. This is the back and lid section.


clip_image012


Step 6. Take 2nd piece of DSP and trim along score lines as previously. Make angled cuts in top section and remove top side pieces so you end up with a piece like that shown. This becomes the front and bottom sections.


clip_image014


Step 7. Place sticky trip on right side of flap as shown.


clip_image016


Step 8. Remove red liner on sticky strip and place base of 1st section onto 2nd section as shown taking care to match score lines. You should now have a piece like this.


clip_image018


Step 9. Place sticky strip on right side as shown.


clip_image020


Step 10. Place sticky strip on wrong side as shown.


clip_image022


Step 11. Remove liner tape from bottom section and join back side piece to bottom side piece. Do the same for front side section. You should now have something resembling this.


clip_image024


Step 12. Do the same for the top side sections to complete lid.


clip_image026


And this now should be what you end up with. All you need to do now is decorate it as you wish. If you have used DSP you can use the left over pieces to make some co-ordinating cards to go inside.


Here are some examples of finished boxes and some cards:

clip_image027


This is my finished tutorial box. I've used the Round Tab punch, 1" circle punch, Old Olive 5/8" grosgrain ribbon and Antique Brass Hodgepodge to decorate and complete my box.


clip_image029

This is one made using the Spring Fling DSP and I've started making some cards to match using the left over DSP.


clip_image030


This is of course my cute little card box that I first made.


100_1048


This final one is using some of the Berry Bliss DSP and the One of a Kind stamp set.


Tutorial created by Nicole Stalker http://www.nicolestalker.blogspot.com/ and http://www.nicolestalker.com.au/


Enjoy and please leave a comment and include a link to your creations.


 photo Nikki4.png

Tuesday, August 12, 2008

My cute little bag


I can't take full credit for what I'm going to show you today as I first saw something similar on Jayne Mercer's blog here (on 8/8/08) and she found it here on Josee Smuck's site. It got me thinking about adapting the pattern so you could pick up the ribbon handle and take the whole thing instead of just the lid. (I could see that happening anyway so maybe someone else could too). So my idea was to move the handle but I also thought about making the lid as one with the box. I also wanted to be able to fit some standard size cards into the bag.

Before I had time to fiddle with this, as I did all those other projects first, I came across an adaptation to the original Bag that Carol Dunstan had made here. Carol had the same idea as me of relocating the handle onto the base of the bag and also increasing the size to fit our cards. However I hadn't worked out how I was going to do my ribbon relocation as yet, so I've pinched that idea from Carol, I'm sure she won't mind.

So on Sunday I spent some time adapting the original tutorial by Josee Smuck so that it would fit our sized cards and gave it a flip lid. This is how it turned out.


Fall Flower Card Bag shut


And with the lid open


Fall Flower Card Bag open


I still want to tweak this a little bit more but overall I'm happy with the end result. I should be able to fit 6 cards and envelopes in this comfortably. Guess I need to make some cards to match to put inside now....

In case you were wondering, there is not stamping at all on this bag. 

Supplies:
Card: Fall Flowers DSP, Bashful Blue
Accessories: Antique Brass Hodgepodge, Bashful Blue Striped Ribbon, Round Tab Punch, 1 1/4" circle punch.


 photo Nikki4.png

Monday, August 11, 2008

Always A Beautiful Thing


Always 1 This is one of the layouts and colour combinations I used to create a page in a Friendship book I mentioned I stamped in last Friday night. I recreated the page and then layered onto a co-ordinating Bashful Blue card. I really like the colour combination on this card and the bird stamps out beautifully on Stampin' Up's Whisper White cardstock.


Supplies:
Stamp sets: Always
Card: Bashful Blue, Purely Pomegranate, Old Olive, Whisper White, Pumpkin Pie Prints DSP
Ink: Bashful Blue, Purely Pomegranate, Old Olive
Accessories: Soft Subtles Brads (Bashful Blue), Word Window Punch, 1 1/4" Circle Punch, 1 3/8" Circle Punch, Stampin' Dimensionals.


A Beautiful Life 1 copyThis is the 2nd card recreated from another page in a different Friendship book.

  I've altered this one slightly from the page. I've had to use different words as they are a rub-on and we only get one sheet of black and one of white in a pack so of course I used the other words on the page.


100_0996

This is the original page in the book. As you can see there are a few changes but I like both. I love the jumbo wheel 'It's Beautiful' that I've used on the Purely Pomegranate cardstock. I'm sure you will see lots more of this one but remember it's only available for purchase from the Spring Mini Catalogue (1st August - 30 November).


Supplies for Card:
Stamp sets: A Beautiful Thing, It's Beautiful (Jumbo Wheel)
Card: Pretty in Pink, Close to Cocoa, Purely Pomegranate, Whisper White.
Ink: Purely Pomegranate, Pretty in Pink
Accessories: Pretty In Pink Taffeta ribbon, Small corner rounder punch, Scallop Circle Punch, 1 3/8" Circle Punch, Tool Kit, Rhinestone Brads - Fire, Eastern Elegance Rub-ons, Stampin' Dimensionals.

Supplies for Page:
Stamp sets: A Beautiful Thing, It's Beautiful (Jumbo Wheel)
Card: Purely Pomegranate, Close to Cocoa, Whisper White
Inks: Purely Pomegranate, Pretty in Pink
Accessories: Pretty in Pink grosgrain ribbon, Rhinestone Brad - Fire, Eastern Elegance Rub-ons, Stampin' Dimensionals.


 photo Nikki4.png

Sunday, August 10, 2008

I have an Award


award1

I totally forgot about Leonie Schroder giving me this award until I was checking my blogger settings just now and realised I hadn't published Leonie's comment which contained a link to my award from the 11th July. So sorry Leonie but thanks for my award.

This is my first time receiving an Award of this kind. Must mean I'm doing something right, well I sure hope so anyway.

I now have to pass this on to 5 other bloggers, so who will I give it to.....


1. Marelle Taylor - I've only known Marelle since joining Stampin' Up but she has been so helpful when I've needed some information, guidance or answers to a 'How do you do that?' question, she so deserves this award. Of course her blog is wonderful too.

2. Makeesha Byl - I've crossed paths with Makeesha at Convention but that's about all. However, she has a fabulous blog and is so generous with her ideas and time that even though Leonie gave this award to her last month I'm still going to give it to her again this month.

3. Teneale Williams - I've met Teneale a few times at the Papercraft Festivals when she has been part of the Stampin' Up team to demonstrate and run the stall. She is a lovely friendly lady who does wonderful work. Teneale has only recently given into the pressure of starting a blog but she has plenty of gorgeous creations on there already to tantilise you all.

4. Sam Post - Sam & I have only briefly met but we have conversed on many occassions via email. Sam is always making great cards and projects that she shares on her blog.

5. Sarah Klass - Sarah has some wonderful creations on her blog. She is also responsible for some inspiration on my recent craft room relocation and renovation. Sarah revamped her room a while back with some wonderful IKEA furniture which I also have some of now too. Thanks for sharing those photos Sarah as I am very happy with my room now.

Thank you ladies for sharing your wonderful work via your blogs with all of us that visit them for inspiration.


 photo Nikki4.png

Some different projects


No post yesterday but I'm going to make up for that now I hope.

It was my regular fortnightly stamp night with friends on Friday night and we also stamped on Saturday night too this week.  Friday night I spent the evening catching up on some Friendship Books that I needed to create pages for, so I won't show you those even though I did use Stampin' Up products, as I'm going to recreate them as cards which I will then share with you (hopefully I'll get those done today). However last night I was very productive and completed 4 weeks of projects that another demonstrator, Makeesha Byl, graciously shares with us on an Australian Demonstrator Group each Monday. Makeesha also puts these on her blog so you can locate the tutorials there if you are interested in making them yourself.

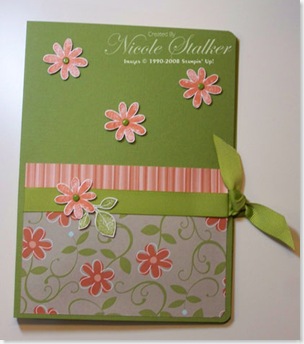
The first project Makeesha shared with us was a Gift Card Holder. I decided to make mine also using our latest Colour Challenge which was River Rock, Purely Pomegranate and Very Vanilla. I've used one of the new Spring Mini Catalogue stamp sets and matching wheel to make mine.    

A Beautiful Life Gift Card Holder


A Beautiful Life Gift Card Holder Open copy

Supplies:
Stamp sets: A Beautiful Life, It's Beautiful (Jumbo Wheel)
Card: River Rock, Purely Pomegranate, Very Vanilla
Inks: River Rock, Purely Pomegranate
Accessories: Metal Edge Circle Tag, Purely Pomegranate Double-stitched ribbon, Scallop Circle Punch, 1 1/4" Circle Punch, 1 3/8" Circle PunchPretties Kit (1/2 back very vanilla pearl), Stampin' Dimensionals.


The 2nd weeks project was a CD Holder. I decided to use some Designer Series Paper that I hadn't used yet and went with Spring Fling. I love how this turned out.
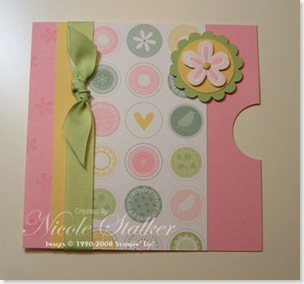
CD Holder - Spring Fling 

Supplies:
Stamp sets: Little Pieces, Priceless
Card: Pretty in Pink, So Saffron, Certainly Celery, Whisper White, Spring Fling DSP
Ink: Pretty In Pink
Accessories: Certainly Celery 5/8" Grosgrain Ribbon, Scallop Circle Punch, 1 3/8" Circle Punch, Rich Regal Brads (So Saffron), Stampin' Dimensionals.


Week 3 was to make a Horizontal Pocket Card. Again we used some Designer Series Paper for this one so I went for an old favourite and matching stamp set that I haven't used in a while. I loved how this one turned out too.
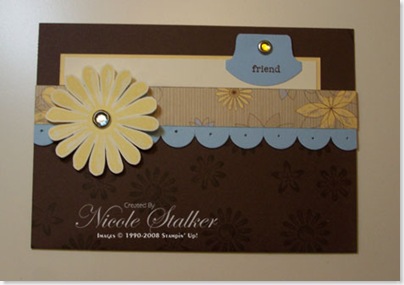
Horizontal Pocket Card - Looks Like Spring

Supplies:
Stamp sets: Looks Like Spring, Everyday Flexible Phrases
Card: Chocolate Chip, Bashful Blue, Barely Banana, Very Vanilla, Spring Showers DSP**
Ink: Chocolate Chip, Barely Banana
Accessories: Slit Punch, Tool Kit (Paper Piercing Tool), Round Tab Punch, Rhinestone Brads - Fire & Ice, Stampin' Dimensionals.

**Spring Showers and Spring Flowers Designer Series Paper is still available however it does not appear in the current catalogue. Please speak with your demonstrator if interested in ordering.


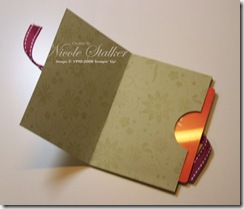
Last weeks project was a Lettering Set. I'm really happy how this one turned out too. Yes we used more Designer Series Papers so I picked which one I was going to use and then selected my Textured Cardstock to co-ordinate.

This is how it looks closed

Lettering Set- Fall Flowers & All Through the Seasons

and then this is the inside
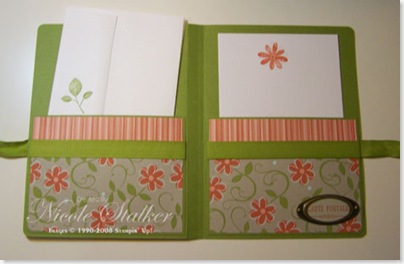
Lettering Set - Fall Flowers & All Through the Seasons Open

Supplies:
Stamp sets: All Through the Seasons, Carte Postale.
Card: Old Olive Textured Cardstock, Fall Flowers DSP, Sahara Sand, Whisper White, White Parchment paper (non -SU)
Inks: Really Rust, Old Olive
Accessories: Antique Brass Hodgepodge, Old Olive 5/8" grosgrain ribbon, Small Corner Rounder Punch, Whisper White Envelopes, Earth Elements Brads (Old Olive), Stampin' Dimensionals.

So what do you all think? Was I productive last night?? Aren't Makeesha's projects wonderful and she is so generous for sharing the tutorials with us. Don't forget you can view them on her blog if you wish to make some, or all, for yourself. I know I'll be making more and can't wait to see what this weeks project will be.


 photo Nikki4.png

Friday, August 8, 2008

Follow your Heart


This must be a record for me. 4 postings in one day. Don't get used to this as guaranteed it won't happen often. I'd like to, don't get me wrong, but we all know that life gets in the way sometimes, especially when you have 4 children. I know that's not your fault but unless you want to come and watch them for me then you'll just have to put up with it....hahaha.

Moving right along I'll get to the purpose of my post.

One of the fabulous Australian demonstrator groups I'm in has regular challenges. I really don't know how the wonderful and inspiring moderators manage to do all they do in this group considering they have very busy lives with both family and their Stampin' Up businesses but I sure do appreciate it.

Anyway in this group we get colour challenges, sketch challenges, challenges using a certain product, or maybe just a theme. One of the more recent ones was to use some of the wonderful Rub-ons available from Stampin' Up. Now I'm not a real sticker kinda gal but these rub-on's are totally different and are just gorgeous. I have most of the packs available and used some recently in this post on the last 2 cards.

Now for the rub-ons challenge I decided I wanted to do something different instead of using them on a card. This will also show you the versatility of them. So what did I decide to do??


Decorate a glass candle holder.

Finished Candle Holder 1 Finished Candle Holder 2

I looovvve candles so I really didn't need an excuse to purchase a new one (it's cucumber and green tea just in case you wanted to know and it smells divine and it's not even lit yet). I've used a small glass hurricane candle holder and decorated it with the Urban West rub-ons in white. The Rub-ons come with a sheet each in black and white.

Now this is just one idea for using rub-ons. You can decorate almost anything with them. Just use your imagination. You can add them to ribbon, decorate your diary, coffee mug, picture frames, add them to cards and/or scrapbook layouts, to name just a few things.

If you've done something different with Rub-ons lately leave me a comment and a link to share your project.


 photo Nikki4.png

Just wanted to share....


This is a post of a different kind. I just wanted to share with you all what I came downstairs to this morning.

Anniversay 08

Today is my 13th Wedding Anniversary.

My husband ducked out to the shops very late last night to get some things for his business workshop and obviously purchased these while there. He must have kept them in his work van until I went to bed, which wasn't much before midnight as he would not have been able to sneak them in without me seeing them as my craft room is next to the front door....hahaha.

I told him he was sneaky but when he walked into his study to gather his things for work he found some chocolates and an Indiana Jones DVD pack waiting of him too. He said I was just as bad....hahaha. 

Have a great day everyone. I'm going to spend my day finishing off the rag quilt for my youngest daughter, doing some more stamping so hopefully I'll have some more posts over the next few days and then tonight is my fortnightly stamp night. Yes no Anniversay dinner tonight but maybe tomorrow..... My eldest was supposed to be going to Taronga Zoo for the night with Girl Guides but we've only just found out this morning that they missed out. Hopefully next year.


 photo Nikki4.png

Baby Card

You may have realised that I don't make a lot of baby cards. My family and friends have all had their children so I don't have a real need. I do have a few stamp sets that are for babies or can be used for baby cards just in case I need to use them for workshops or the need does arise for a baby card to be made.

Well that need arose last night as one of my girls teachers leaves on Maternity Leave today. Of course my daughter had to ask last minute if we could get her a little something, so off we went to the shop after dinner and considering we don't know what she is having we just purchased some white singlets and white socks. Then we went to get some wrapping paper but everything was gender specific so we decided to use a wrapping paper we already had at home that was suitable (not specifically baby but close enough) and then she wanted a card. I said "Hello, don't you think I can make the card??" Bit silly having all these stamps and then purchasing a card, don't you think??? So off we went home and the pressure was on to get something done right then before she had to go to bed.

So I reach for the Bundle of Joy set and she wanted the teddy on the card. Next step was choosing the colours so it was reasonably neutral (not definitely for a boy or a girl). We chose Close to Cocoa so we could have a brown teddy and then out comes the Colour Coach. Co-ordinating colours were Sage Shadow, Barely Banana and Pixie Pink. I decided to leave the Pixie Pink out as the Sage Shadow and Barely Banana I thought could be used for either a boy or a girl but most definitely adding the Pixie Pink would have gone more towards a girl.

I started out by stamping the Teddy onto some Watercolor Paper and then using the Close to Cocoa inkpad and my aqua painter proceeded to watercolour the teddy. That done, what next????  Hhmmmm.... I've got an idea. What if I use the Big Deal Alphabet and stamp out Baby? So I decided I would stamp colour on colour for the letters and stamped 2 b's on the Sage Shadow using Sage Shadow ink and the a and y onto Barely Banana using Barely Banana ink. I then cut them out. What now????  Well what if I layer them onto the Close to Cocoa, yes that looks pretty good. Now if I make the main card Sage Shadow and I'll stamp the card using the Sage Shadow ink with the moon and stars from Bundle of Joy just to give it a lift, then maybe layer the Close to Cocoa onto some Barely Banana, yes that's looking okay. Then if we cut the teddy out and we can put him about here...... So what do you think Courtney (my daughter)? Good. Okay so now I just have to stick it all down....  Wait. What if I stamp this dotty image onto the Close to Cocoa before I put the letters on?? Hmmm (says Courtney). Well I'll give it a go and if we don't like it I'll just flip the piece over.....

So Courtney should I put the letters on Stampin' Dimensionals? I'll put the teddy on some too. "Yeah" say Courtney. So I add dimensionals, and stick everything down and this is what we ended up with. I'm not sure if it still needs something but all my girls and hubby thought it came out okay and was fine as is.

Bundle of Joy & Big Deal 

Of course the card given to her teacher doesn't have my watermark on it.....hahaha


What do you think? Did it turn out okay or do you think it still needs something?


Supplies:
Stamp sets: Bundle of Joy, Big Deal Alphabet
Paper: Close to Cocoa, Sage Shadow, Barely Banana, Watercolor Paper
Inks: Sage Shadow, Barely Banana, Close to Cocoa, Stazon Black.
Accessories: Stampin' Dimensionals, Aqua Painter, Paper Snips.


 photo Nikki4.png

Berry Bliss Box in a Bag


I made this Box in a Bag over a week ago Box in a Bag Berry Blissand just haven't made time to photograph and edit it. Sorry I was sidetracked with some Machine Embroidery now that I can get to my machines again and have been making a rag quilt with embroidered fairies for my youngest. Hoping to finish that off today too. But that's another story and another craft.....

You may have already seen one (or more) of these on other blogs as they seem to be one of the in things right now. You can find a tutorial by  Diana Gibbs (click on Diana's name to be taken to her tutorial) which she posted back on the 4th June so they have been around for a little while it's probably just that we are all discovering them now or have seen them on someone else's blog and wanted to give it a go ourselves. They are rather easy and quick to make.

I decided to make mine using the lovely Berry Bliss paper to co-ordinate with my last post of cards made using some of this paper too. There is no stamping on this card. I've used the small star punch and silver brads for the embellishments on the front as there are stars in the patterned paper as you can probably see for yourself. 

I have a promotion running this month and you could receive a pack of the Berry Bliss DSP for free.  Contact me for more details.

Supplies:
Paper: Purely Pomegranate, Pretty in Pink, Close to Cocoa, Berry Bliss DSP
Accessories: Small star punch, Round tab punch, Slit punch, Silver brads, Pretty in Pink Taffeta ribbon, Sticky S
trip, Mini Glue Dots


 photo Nikki4.png